Project: Creating a WebCam to Monitor Livestock
- Goal
- Assumptions
- Parts
- Hardware Assembly
- Software Configuration
- Configuring and Testing the WebCam
- More Adjustments
- Going Further
- Notes
Goal
The goal of this project is to build a small, cheap wireless camera that can be monitored from a phone (or computer). The camera is relatively low power and, with a suitable case and power supply, could be placed in a barn or field.
This project uses the Raspberry Pi 3, a small, cheap computer with built-in Wi-Fi as well as a Camera Module for it. The parts used here cost less than $65. Once a prototype has been built, it would be possible to substitute parts to get the cost down to approximately $30 per camera (using a Raspberry Pi Zero).
Assumptions
This project assumes that:
- You already have a Wi-Fi network
- That your Wi-Fi network uses a simple passpharse (Pre-Shared Key / PSK)
- You have the required parts
Parts
The Camera Itself
-
Raspberry Pi 3 Kit
(Amazon Link)
- Raspberry Pi 3
- Case
- Heatsinks (optional)
- SD Memory Card (8GB or more)
- Micro USB Power Adapter
- HDMI Cable
Parts needed temporarily for configuration
- USB Keyboard (Just used tempor)
- USB Mouse
- HDMI Capable Monitor (Most recent LCD monitors or flat screen TVs)
Hardware Assembly
-
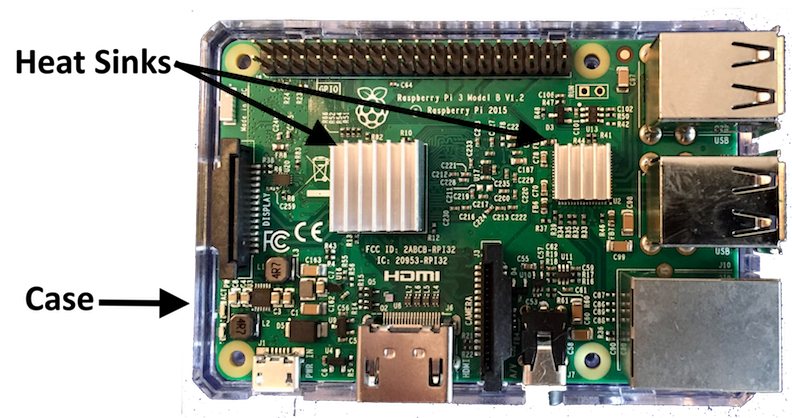
Assemble the basic Raspberry Pi.
Typically this will include putting the Pi in a case and attaching heat syncs (the kit comes with adhesive). The Pi should look something like this:
-
Add the camera
- First, find the camera connector.
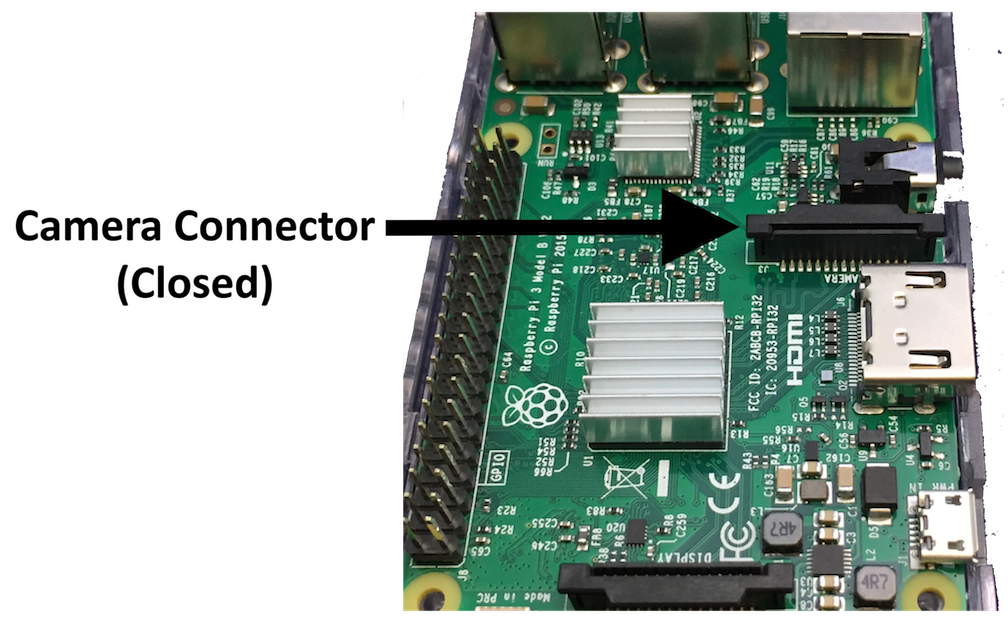
- Second, lift the latch on the connector (gently lift the tabs on each size):

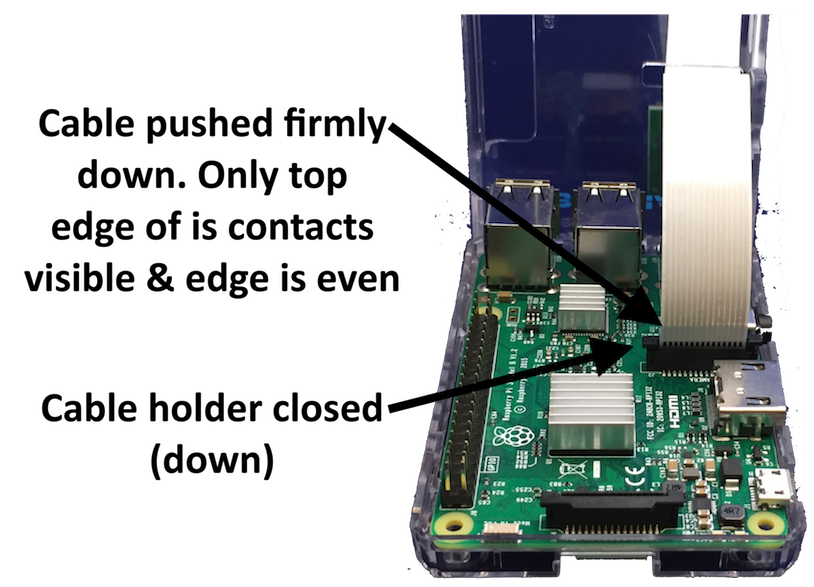
- Then run the camera cable through the case cover and push it into the connector. Be sure the contacts face the correct direction.

- Finally, make sure the cable is inserted as far as possible and push down the connector.
- First, find the camera connector.
-
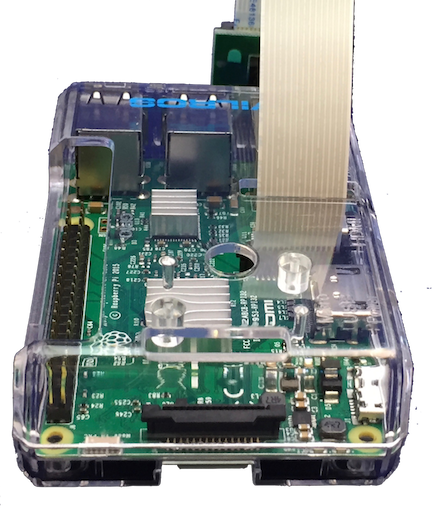
Close the top cover.
-
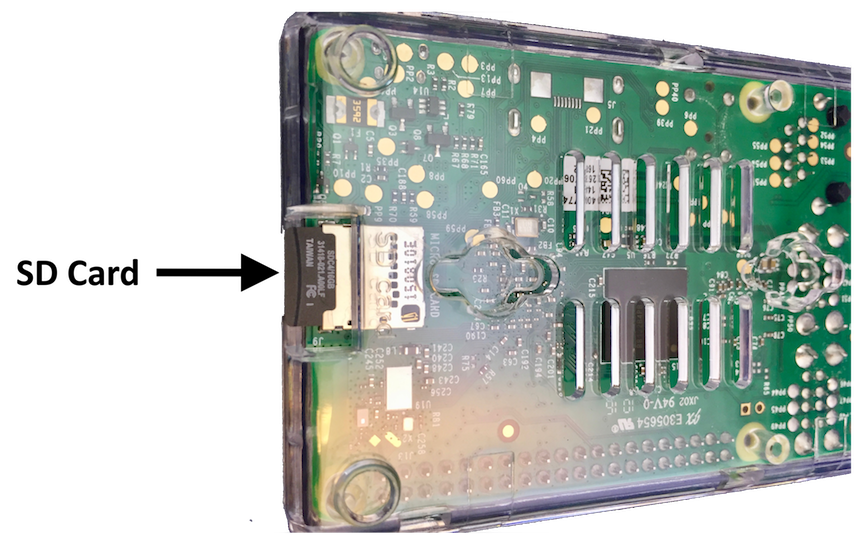
Insert the SD Memory Card in the port on the bottom
-
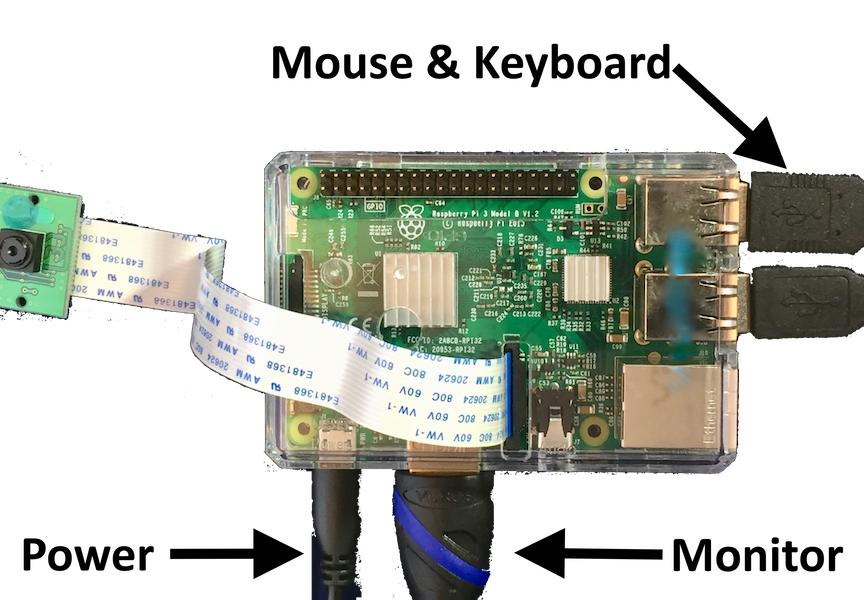
Connect the Keyboard, Mouse, HDMI (video to monitor/tv), and Power Cable.
Software Configuration
Install Raspbian
Check the documentation that came with your Pi:
- If the memory card contains NOOBS (New Out-Of-the-Box Software), turn on your Pi and follow the instructions to install Raspbian. If you need assistance, see Installing Raspbian with NOOBs.
- If the memory card is blank, you can follow the instructions in the Raspberry Pi Setup Guide to put NOOBS on the Memory card and/or install Raspbian.
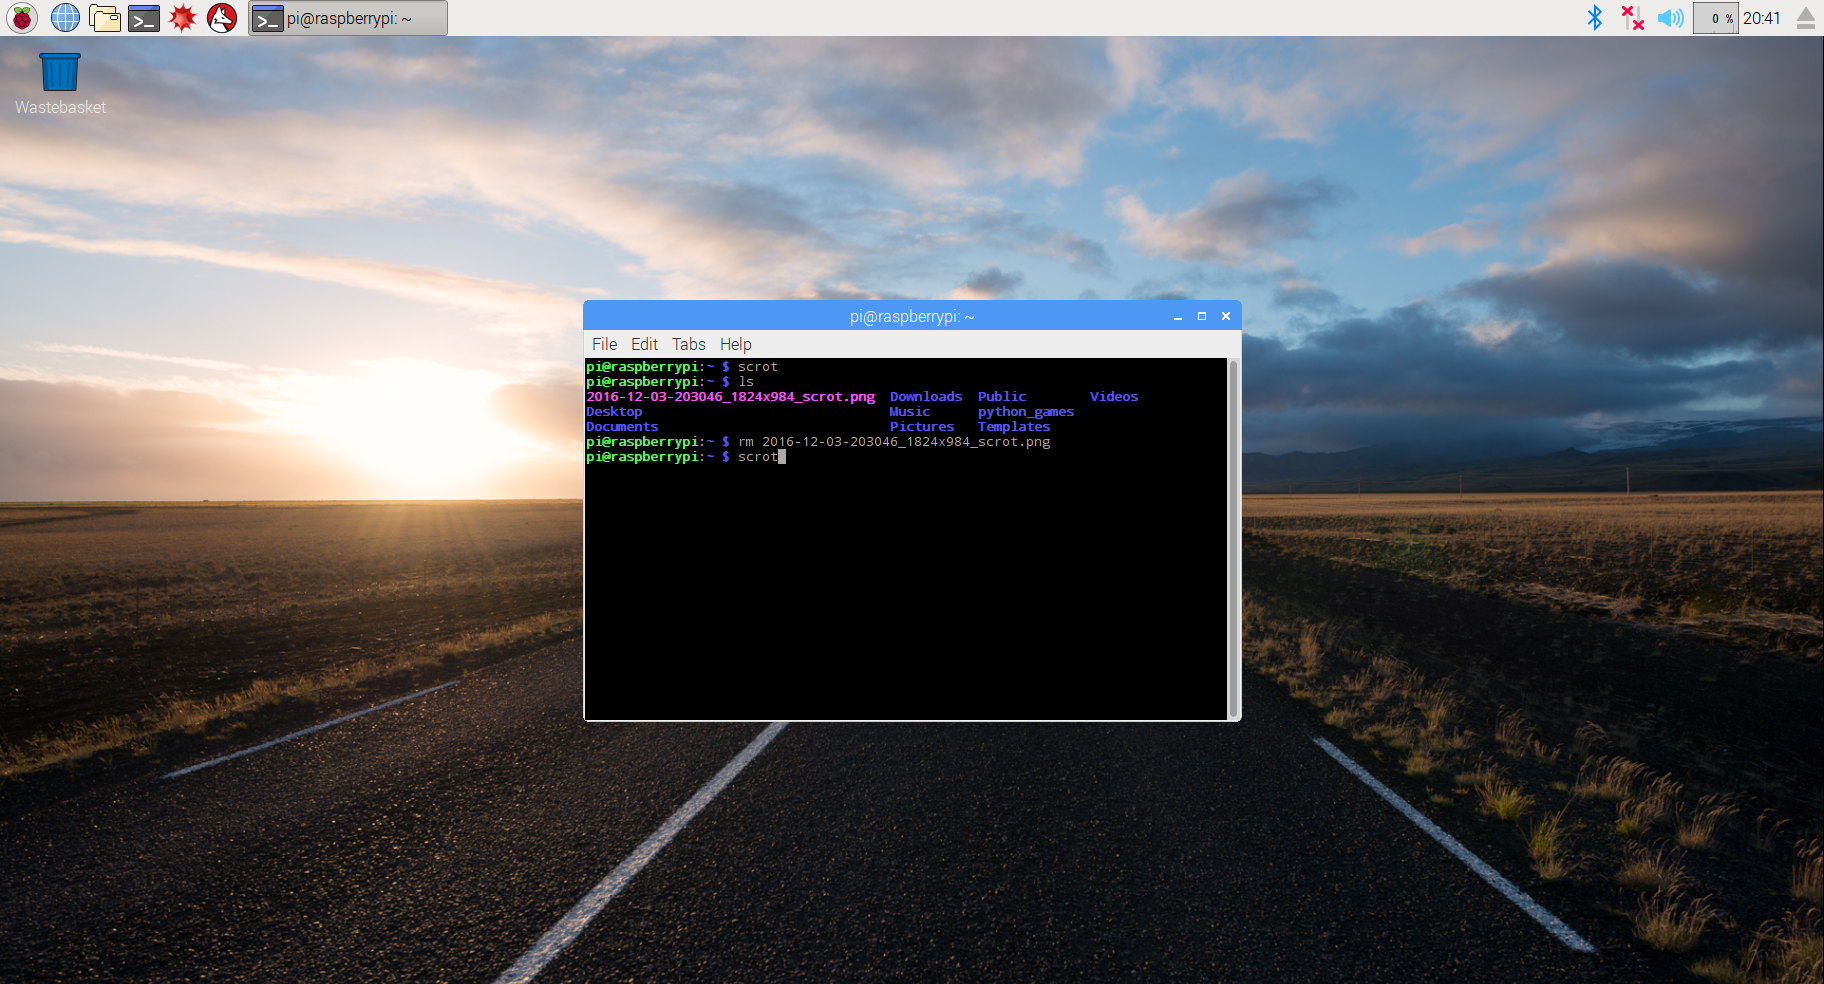
When you’re done, your screen should look like:
Tweak Raspbian (If necessary)
Keyboard:
Unless you selected something different when installing Raspbian, the keyboard layout will be based on a U.K. keyboard. Although most keys work correctly, many of the symbol keys don’t type the expected characters for a typical U.S. keyboard. To change it or verify that it is set correctly:
Wi-Fi
If you aren’t already, connect to your Wi-Fi network:
Enable the Camera Module (& Restart)
Test the Camera
Test the camera by taking a picture. Use the raspistill command to take a picture in the “Run” box:
raspistill -o test.jpg
If you encounter problems:
- Turn off your Pi, disconnect the power, and double check that the camera’s cable is firmly plugged in .
- Review the “Enable the Camera” step. Make sure you have the camera enabled and have restarted the Pi.
Adding a WebCam Server
Raspbain comes with several programs, but it doesn’t include a WebCam server. To add one you will need to run several commands. To make this process easier, the comands have been put in a single file. The following video shows the process you need to follow to run these commands in a terminal.
	wget http://techonthefarm.org/picam
	cat picam | sudo bash
The following video shows the process:
Configuring and Testing the WebCam
The following video shows how to configure the webcam (WebRTC) and how to access it from another computer.
More Adjustments
The settings shown previously may not work well when trying to view the video from a cell phone or tablet. Experiment with the settings until you find a combination that is suitable. The three most significant settings are the ones changed in the video:
- width
- height
- jpeg quality
You can reduce each to make the video smoother, but the image will get smaller when width/height are adjusted and the pictures will get grainier when the jpeg quality is reduced.
You may want to adjust other settings once you’ve installed the camera. For example, if the camera is pointed at a dark room, you may want to adjust the “brightness” setting to improve the detail shown in the video.
Although the width, height, and jpeg quality can’t be changed while you are viewing the video, most of the other settings can be. Try changing each of the following using the “Control Panel” until you understand how they impact the image. After you change each, hit the Apply button and look at the video stream:
- Brightness
- Contrast
- Saturation
- Red Balance
- Blue Balance
- Sharpness
- Rotate
- Horizontal Mirror
- Vertical Mirror
Feel free to experiment with the other settings as well.
Going Further
There are still a number of obstacles you may encounter when actually trying to install a wireless camera.
Protecting the Camera
Unfortunately electronics do not handle weather and dust well, so you may need to put the camera in a weather/dust proof case. You’ll have to ensure that:
- The case will fit the Raspbery Pi and Camera
- The camera’s lens is exposed or there is a transparent cover
- The case has a suitable hole for power (and possibly for an antenna connection)
- The electronics on the Pi and camera aren’t touching any conductive metal
- The case doesn’t interfere with the Wi-Fi radio (being completely enclosed in metal could be a problem, but a little metal or metal just on a side or two is probably ok)
Here are some resources that may help you construct a suitable case:
- MakeUseOf.com’s 3 Things to Consider (when building a Raspberry Pi case)
- MakeUseOf also has an article on ways to ruggedize your Pi: 5 Ways to Ruggedize your Raspberry Pi
- Reddit has a channel for Raspberry Pi cases: PiCases
- The TinkererBlog has a post on a weather proof Raspberry Pi Camera Case: RainBerry
- A google search for things like “Weather proof raspberry pi” and “ruggedize raspberry pi”, etc. can uncover a lot of additional approaches.
Wi-Fi Range
You may want to install the camera far from a Wi-Fi Access point. The Pi’s built-in radio transmits in all directions. Unfortunately this limits the range to a few hudred feet from the Wi-Fi access point (or less, depending on walls, height differences, etc.).
By using a different radio and focusing the direction of the radio it’s possible to extend the range significantly. One common approach is to build a custom antenna from a tin can or pringles can (since it’s a Can + Antenna it’s typically called a Cantenna). Here are some walk-throughs of creating cantennas:
- Get Lakeside Wi-Fi At Your Cabin By Making A Cantenna For ~$23
- Cantenna? Can Do!
- There are many Cantenna Instructables (but be sure to pick ones that will work for the Raspberry Pi)
Power
If you want to install a PiCam someplace that lacks power, you can power the Pi by battery or solar. It’s important to be very careful when working with any sort of “power supply” project:
- There is a risk of electrocution from incorrect use of power supplies (especially from high capacity batteries, like deep cycle batteries or auto batteries or mains power).
- Power supplies can generate head. A supply that generates too much heat can cause a fire.
- Modern rechargable batteries can store a lot of energy and can start fires if misused or mishandled. Be sure any batteries are in protected from physical damage, but have room to expand if they heat up. Do not try to use a battery that you have any reason to suspect is damaged.
- Using an incorrect power supply can damage/destroy the Raspberry Pi
For these reasons, anytime you try to add a power supply to something in an unusual way, it’s critical that you have carefully reviewed all the details. You need to ensure that you use proper safety measures when working with power supplies and that the supply and any power convertors are rated appropriately for the equipment you’re trying to power.
There are several places that provide details on the power requirements for the reaspberry pi:
- RaspberryPi.org
- HackADay Benchmarks
- Raspberry Pi 3 Dynamic Current Consumption, Power and Temperature Tests
And here are some resources that show different ways to provide power to the Pi:
- MakeUseOf: Pi to Go
- PiBorg: Power your Raspberry Pi from AA batteries
- [AdaFruit’s Pi Power Pack](https://www.adafruit.com/product/1566
- Instructables: Powering your Raspberry Pi with Batteries
It’s also possible to buy pre-built solutions.
Lighting Issues
If you need to use the Raspberry Pi in low light conditions or there’s a need to observe without visible light, you can use cameras that don’t filter our InfraRed light. Here are some examples of the results from using this sort of camera:
- PiNoIR: What’s it for
- Raspberry Pi Camera vs. NOIR Camera (The video shows the the Pi “seeing in the dark” when using an infrared light source)
The cameras and infrared light sources are readily available:
- Raspberry Pi NoIR Camera Module V2 - 8MP 1080P30
.
- WideAngle 90 Degree 4pcs High Power LED IR Array Illuminator with 12V 1A DC Power Adapter
Notes
Instructions based on http://www.linux-projects.org/uv4l/installation/