Project: Gate Minder
Gate Minder!
- Gate Minder!
- Goal
- Assumptions
- Overview
- Parts
- Parts needed temporarily for configuration
- Hardware Assembly
- Configuring, Programming, and Testing the Photon
- Setting up IFTTT and Text Notifications
- Supporting other Locations
- A Brief Explanation of the Program
- Going Farther
Goal
The goal of this project is to build a small, cheap Wi-Fi gate monitor. Really it just monitors a magnetic switch that can be mounted on a gate or door and sends a notification to a mobile phone when the switch changes. It would be easy to extend this project to monitor other things too (light, temperature, humidity, etc.)
This project uses the Particle Photon, a small, cheap computer with built-in Wi-Fi. The parts used here cost less than $25. If a Wi-Fi isn’t available where the project would be used, this project can also be built with Particle’s Electron, which uses the cellular network to exchange information and requires additional cellular data service (as low as $3 per month).
Assumptions
This project assumes that:
- You already have a Wi-Fi network
- You have the required parts
Overview
This project will have several steps:
- Assemble the hardware (the Photon and switch)
- Program the Photon to connect to the Internet and send updates anytime the gate opens/closes.
- Download the Particle.io App
- Use the app to create an account with Particle
- Use the app to configure the Photon to connect to your Wi-Fi access point (and the interent)
- Connect to Particle.io’s website from a computer and log in to your account (the one created with th app).
- Open the IDE (Integrated Development Environment, used to program the Photon)
- Paste in the program (given below) and send it to the Photon
- Open the Console and test that the Photon is sending updates to the Internet everytime the gate switch opens/closes.
- Create an account to enable notifications
- Download an app to recieve notifications
- Configure the notifications
When it’s done it will work as shown here:
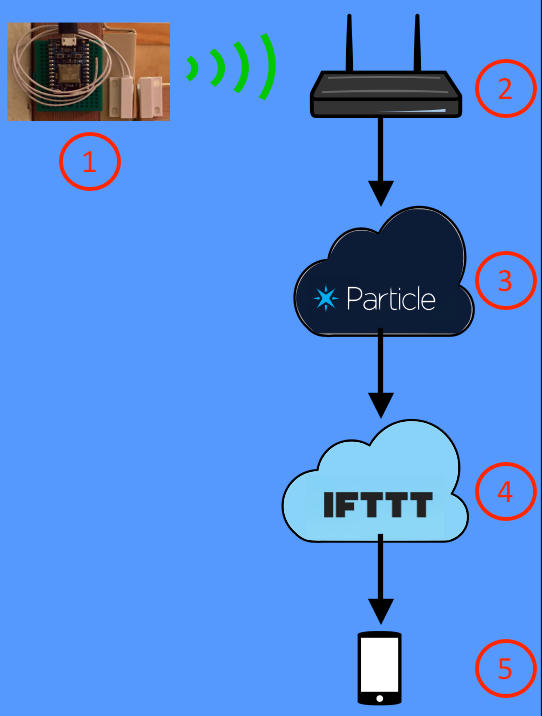
- The Photon and sensor will be mounted on a gate and will sense when the gate opens or closes. The Photon shown here is being used indoors. If it were outside it would need to be in a case to protect it from the elements. The black connector at the top a micro USB cable being used to supply power.
- The Photon transmits any updates to your home Wi-Fi router.
- The Wi-Fi conveys the updates to Particle.io’s cloud service. Particle makes the Photon and provides services to interact with it.
- Particle.io’s cloud service passes the updates on to IFTTT.com’s cloud service. IFTTT stands for “If This Then That”). IFTTT has two services that can be used to send messages to your cell phone: SMS text messages (shown in the videos) and “Notifications”. Notifications don’t use text messaging and could be used instead of SMS texts for this project if desired.
- IFTTT sends the Text message (or Notification) to your cellphone.
Parts
-
Particle Photon
-
A Mini Breadboard
(Only one is needed)
-
A Magnetic Switch
(Only one is needed)
-
(Optional) The device will need to be powered. You may want to add a Micro USB Power Supply
.
Parts needed temporarily for configuration
- A desktop or laptop computer with Internet access.
- A mobile device (phone, tablet, etc.) with Internet access
- A Micro USB cable
Hardware Assembly
- Prepare the Photon
- Slide it out of the box
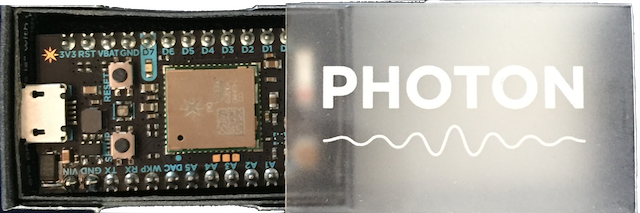
- The Photon’s pins (wires) are protected by a block of foam:
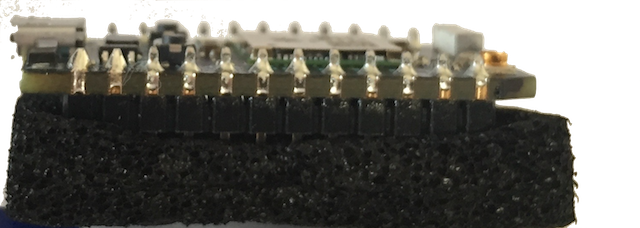
Gently grab the foam on both sides and pull it away from the Photon. Be careful not to bend any of the Photon’s pins (wires). When done it should look like: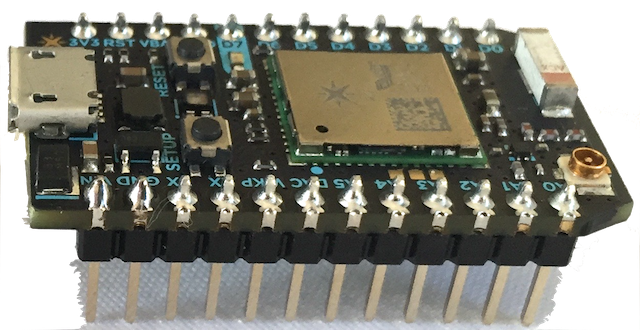
- Slide it out of the box
- Mount the Photon on the Bread Board
- Gently set the Photon on a breadboard (the color of the breadboard doesn’t matter) with the USB connector facing the right.
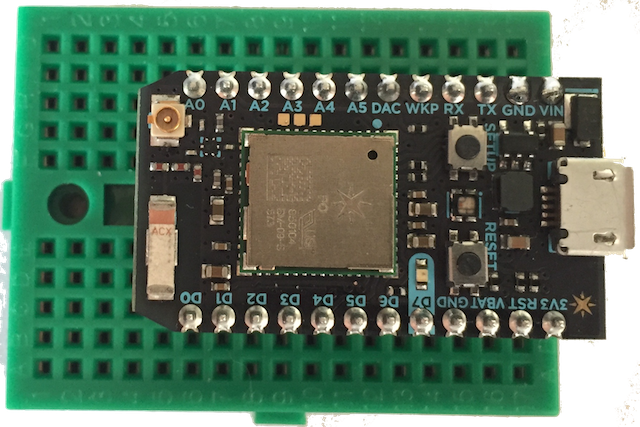
Notice that there wires on the Photon exactly align with those on the breadboard. Be sure that the Photon is along the right of the breadboard and centered from top-to-bottom. There should be two rows of holes above and below the Photon: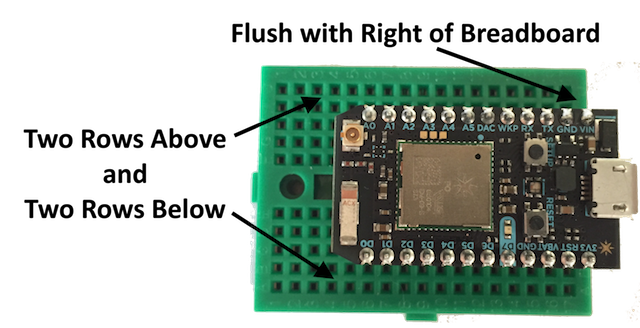
- Make sure the pins (wires) on the Photon align with the holes on the breadboard:
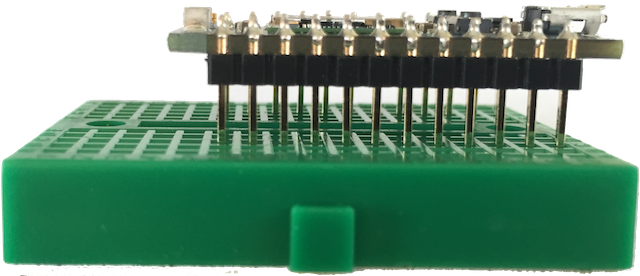
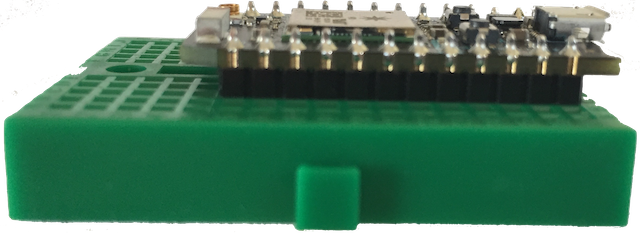
- Put one finger on the left of the Photon and another on the right. Gently push down on both at the same time until the Photon sits flush on the breadboard:
- Gently set the Photon on a breadboard (the color of the breadboard doesn’t matter) with the USB connector facing the right.
- Wire the Gate sensor
- Identifying the Part
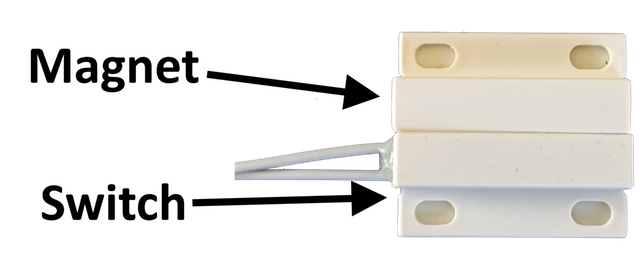
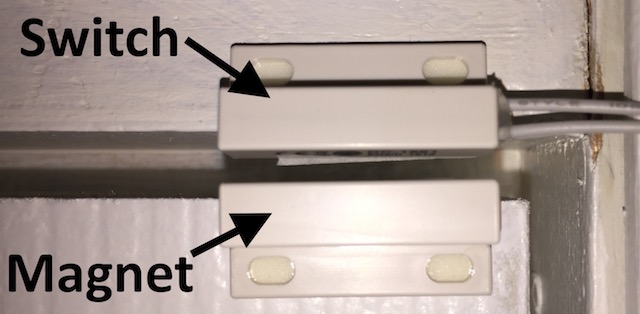
There are two parts to the gate switch: a magnet and the switch itself. When the magnet is close to the switch it will “close” the switch (cause electricty to flow), which will indicate the gate is closed. When the magnet is far enough away from the switch (~1 inch) it will “open” the switch (electricy won’t flow), which will indicate the gate it open. Generally the sensor is usually installed on something stationary, like a frame or post near the gate and the magnet is usually attached to the moving part of the gate. Here’s an example of how they could be mounted on a regular door. Notice that the switch and magnet face each other and are close, but not touching, when the door is closed.
When the door is opened the magnet will move far enough away from the switch to “open” the switch: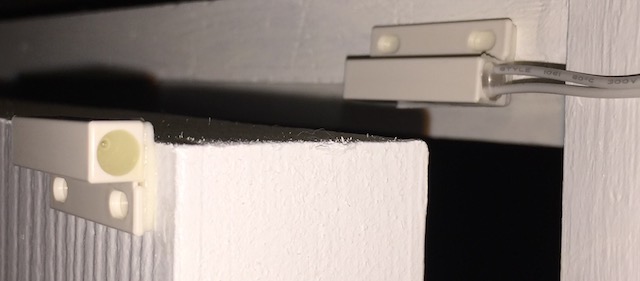
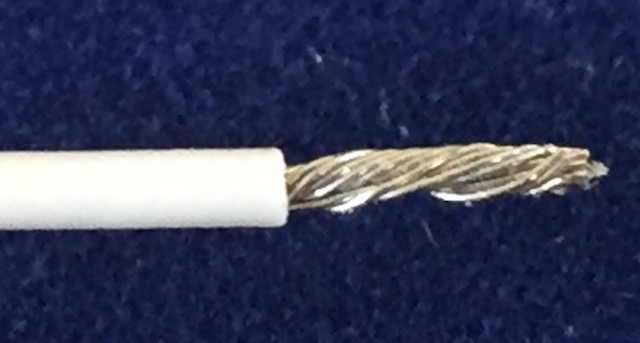
- Adjusting the wires.
The wires on the switch are stranded wire and may be slightly frayed.
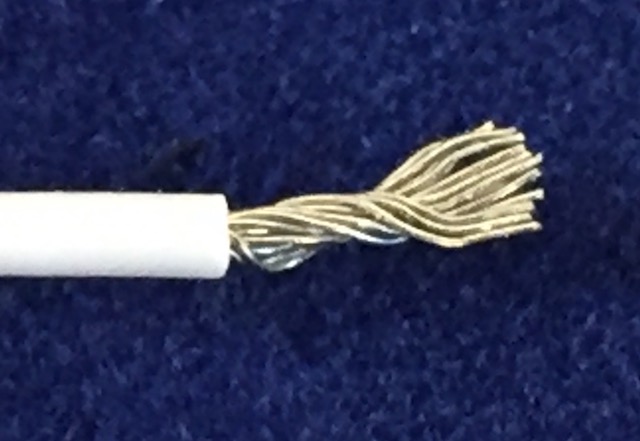
Gently twist them into a fine point.
- Plug one of the two wires into a hole above the “GND” wire on the Photon and ther other wire into a hole above the “D1” wire on the Photon. Here’s an icon view:
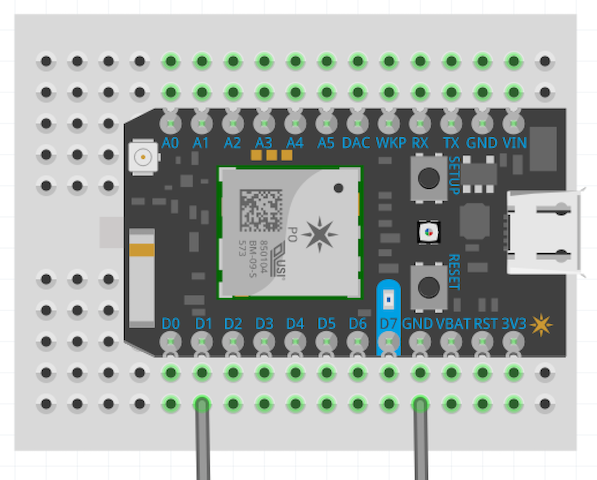
It should look like this:
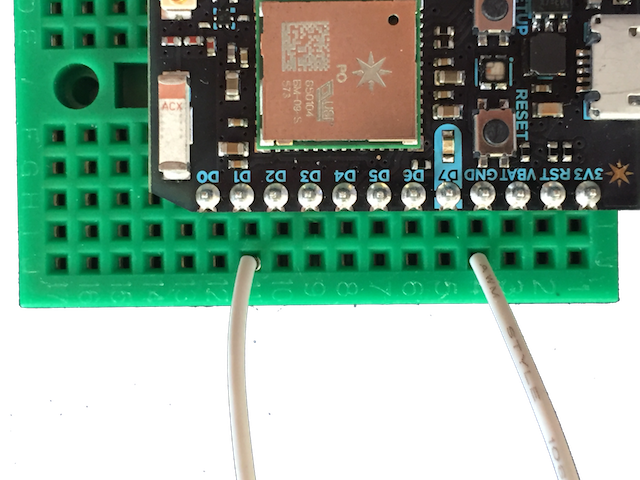
Try to make sure that the wire is as far down into the hole as possible. The insulation on the wire should be flush with the breadboard.
- Identifying the Part
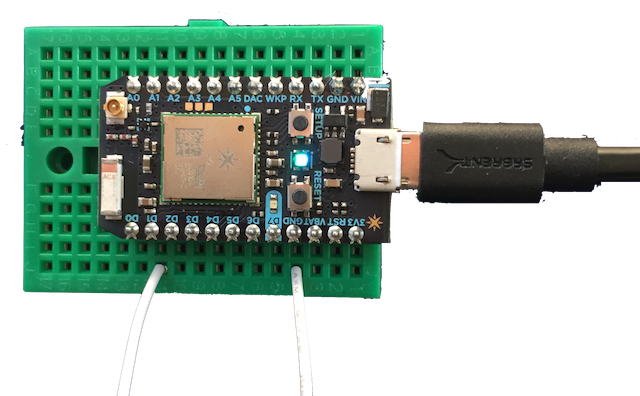
- Prepare it for programming
Connect a Micro USB cable between the Photon and the computer you will use to program it. Make sure the computer is on, which will power the Photon. A light on the Photon should come on:
Configuring, Programming, and Testing the Photon
- Install the Photon App, Create an Account with Photon, and Configure the Photon to connect to your Wi-Fi Access Point:
-
Program and Test the Photon
The Program Code
const int SWITCH_PIN = D1;  // The Pin that the gate switch is connected to
bool updateGate = true;

void setup() {
  // Set up the Pins and run code whenever the gate changes state
  pinMode(SWITCH_PIN, INPUT_PULLUP);
  attachInterrupt(SWITCH_PIN, switchChanged, CHANGE);
}

void switchChanged() {
  // Update the flag to indicate the gate has changed state
  updateGate = true;
}


void loop() {
  // If the gate has changed
  if(updateGate == true) {

    // Get the gate's current condition
    String status;
    bool switchValue = digitalRead(SWITCH_PIN);
    if(switchValue == true)  {
      status = "open";
    } else {
      status = "closed";
    }
    // If connected to the internet
    if(Particle.connected()) {
      // Update the gate's status
      updateGate = false;
      Particle.publish("gateStatus", status, 60, PRIVATE);
    }
  }
  delay(1000);
}
Setting up IFTTT and Text Notifications
Supporting other Locations
The Photon can be configured to work with up to 5 different Wi-Fi access points. In order to add a new network:
- Put the Photon in “Listening Mode” by holding down the Setup button for 3 seconds. The light should begin blinking Blue.
- As before, use the Particle App to connect to the Photon and configure it’s Wi-Fi settings and password.
A Brief Explanation of the Program
Going Farther
-
Understanding Modes The Photon’s light is used to indicate what it’s doing and if there are any problems. The full description of modes is available here.
- Now that the basic Gate notifications are working, here are a few resource that could help you actually install it “in the field”. First, you might consider the following features:
- Use Notifications or e-mail rather than SMS Text messages
- Add new IFTTT applets that also send updates when the gate closes and/or when the Photon’s battery fails (when it goes offline — this requires a “Monitor your device status” change rather than an “New event published”)
- If a Wi-Fi signal isn’t available, but a cell phone signal is, consider using the Particle Electron instead. (Requires ~$3/mo data service)
-
Build an Enclosure so your Gate Minder can be used outside. Be sure to keep the electronics dry and out of excessive heat.
- Power
If you want to use
- SparkFun Photon Battery Shield: SparkFun sells a “battery shield” that could be used to provide battery power to the Photon.
- The Particle Community includes discussiosn on long-lasting batteries.
-
Wi-Fi Range You may want to install the Gate Minder far from a Wi-Fi Access point. The Photon’s built-in antenna transmits in all directions. Unfortunately this limits the range to a few hudred feet from the Wi-Fi access point (or less, depending on walls, height differences, etc.).
By using a different radio and focusing the direction of the antenna it’s possible to extend the range significantly. One common approach is to build a custom antenna from a tin can or pringles can (since it’s a Can + Antenna it’s typically called a Cantenna). Here is a walk-through of creating a cantenna: Extending the core Wifi range with a “Cantenna” - Understanding Photon and Other Projects
- Particle Hackster shows several other projects that use the Photon and Particle’s other products.
- Particle Code Examples provide several examples of other projects that use the Photon.
- Particle Community is a forum for questions and answers about the Photon (and other Particle products)
- Other uses of the Photon
- Use one Photon to monitor two switches
- Use a Photon to monitor temperature or water level.